
Author: Vigor Forty Editorial Team
Medically Reviewed By: Editorial Review Board
Disclaimer: This article is for informational purposes only and is not a substitute for professional medical advice. Read our full Medical Disclaimer.
📌 Key Takeaways
- The push-up is one of the most effective upper body exercises you can do: It works your chest, shoulders, triceps, and core simultaneously—building functional strength that translates to daily life.
- Perfect form is non-negotiable: A proper push-up requires a straight body line, controlled descent, and full range of motion. Quality always beats quantity.
- There’s a push-up variation for every fitness level: From wall push-ups to one-arm push-ups, the exercise scales to match your current strength and goals.
- Progressive overload applies to push-ups too: Increase difficulty by adding reps, slowing the tempo, reducing rest, or progressing to harder variations.
- Push-ups are the foundation for upper body strength: Mastering this movement builds the strength and stability needed for more advanced exercises like bench press and dips.
Introduction: The King of Bodyweight Exercises
The push-up is perhaps the most recognized exercise on the planet. It’s been used by soldiers, athletes, and fitness enthusiasts for generations. And for good reason.
The push-up is a compound exercise that works multiple muscle groups simultaneously. It builds upper body pushing strength, develops core stability, and requires no equipment. It’s accessible, scalable, and incredibly effective.
But here’s the problem: most people are doing them wrong.
Sloppy form. Partial range of motion. Sagging hips. Flaring elbows. These common mistakes don’t just limit results—they increase injury risk and reinforce poor movement patterns.
This guide will teach you everything you need to know about the push-up: proper form, common mistakes, progressions for every level, how to program them into your routine, and how to progress from your first knee push-up to advanced variations.
Section 1: Why the Push-Up?
Muscles Worked
The push-up is a compound exercise that engages multiple muscle groups:
| Muscle Group | Primary Role |
|---|---|
| Pectoralis Major (Chest) | Primary pushing muscle; drives the movement |
| Triceps Brachii | Extends the elbows; assists in the push |
| Anterior Deltoids (Front Shoulders) | Stabilizes and assists in shoulder flexion |
| Core (Rectus Abdominis, Transverse Abdominis) | Maintains body position; prevents sagging |
| Glutes and Quadriceps | Maintains body tension throughout the movement |
| Serratus Anterior | Protracts shoulder blades; critical for shoulder stability |
Benefits Beyond Muscle Building
Functional Strength:
- Pushing open heavy doors
- Getting up from the floor
- Moving furniture
- Playing with children or grandchildren
Shoulder Health:
- Proper push-up form strengthens the muscles that stabilize the shoulder joint
- It builds scapular control, which is critical for shoulder health
Core Stability:
- A proper push-up is a moving plank—your core works throughout the entire movement
No Equipment Required:
- Push-ups can be done anywhere: home, hotel room, park, office
Scalable:
- Anyone from a complete beginner to an elite athlete can benefit from push-ups
Section 2: The Perfect Push-Up—Step by Step
Setup Position
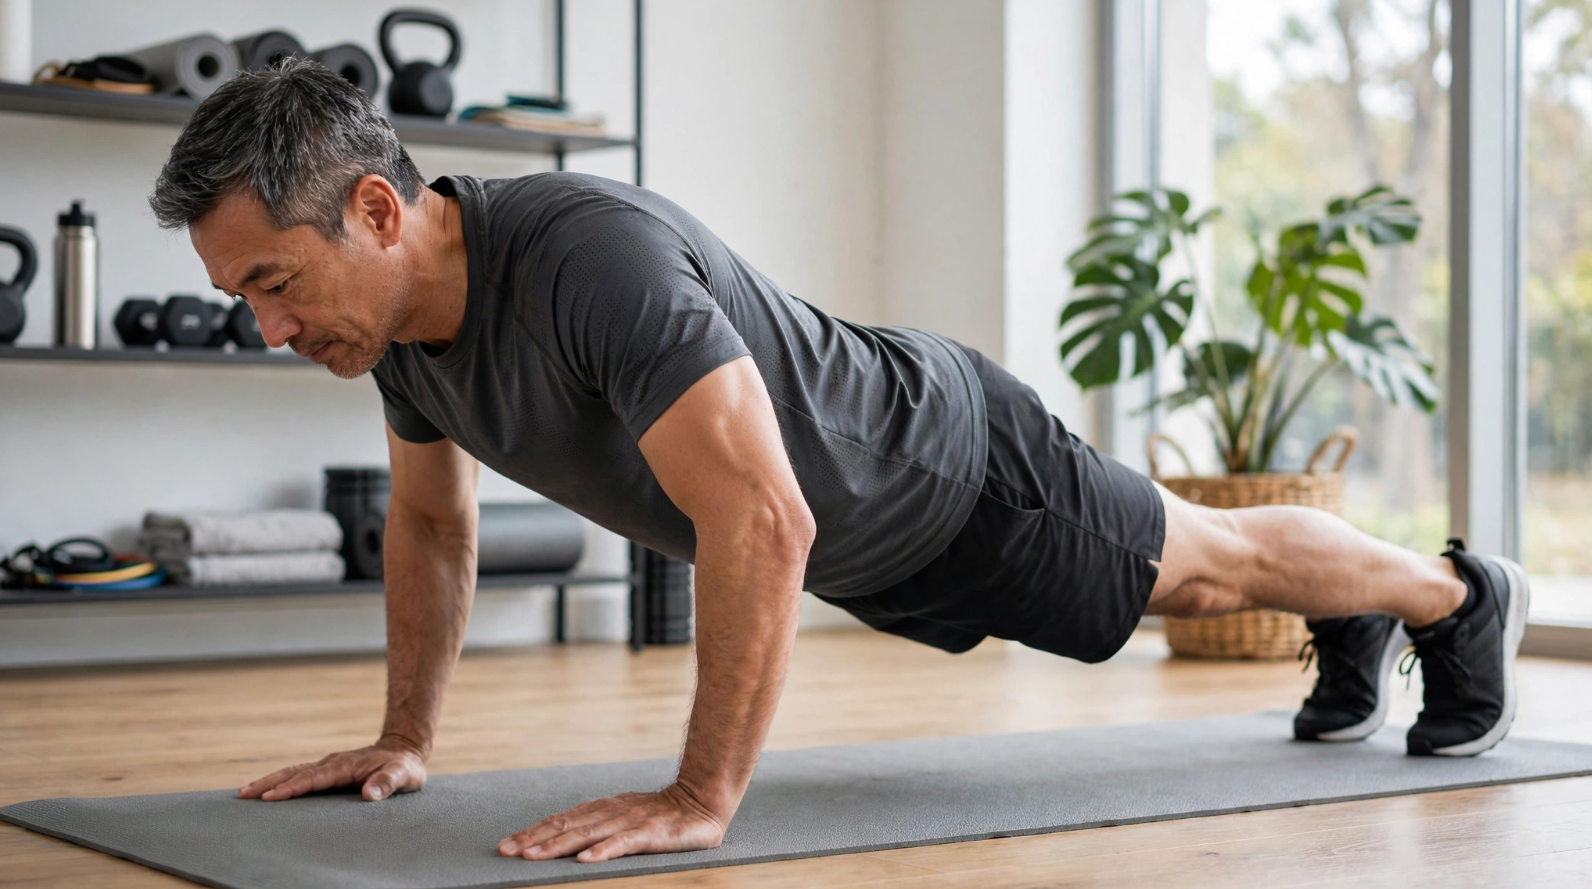
- Start in a high plank position: Hands on the floor, directly under your shoulders. Fingers spread wide, pointing forward or slightly outward.
- Body position: Your body should form a straight line from your head to your heels. Think of it as a rigid plank—no sagging in the middle, no piking at the hips.
- Feet together or slightly apart: A narrower stance increases core activation; wider provides more stability. Start with feet shoulder-width apart.
- Gaze: Look at a spot on the floor about 6–12 inches in front of your hands. This helps maintain a neutral neck position.
- Shoulders: Pull your shoulder blades down and back. You want them “set” in a stable position, not shrugged up toward your ears.
The Descent
- Initiate the movement: Lower your body by bending your elbows. Keep them at about a 45-degree angle from your body—not flared out to 90 degrees.
- Control the descent: Lower yourself in a controlled, steady motion. Don’t drop or bounce.
- Range of motion: Lower your chest until it’s about an inch above the floor. Your upper arms should be roughly parallel to the floor. If your mobility doesn’t allow this, go as far as you can while maintaining form.
- Body alignment: Keep your body rigid—no sagging, no piking. Your glutes should be engaged throughout.
The Ascent
- Drive through your hands: Push through your palms, particularly the base of your thumb and index finger.
- Extend your elbows: Push your body back up to the starting position.
- Maintain tension: Keep your core and glutes engaged throughout. Your body should remain straight.
- Lockout: At the top, your arms should be fully extended but not hyperextended. Don’t overextend your elbows.
The Checklist
Before each rep, run through this checklist:
- Hands under shoulders
- Body straight from head to heels
- Glutes and core engaged
- Shoulders set down and back
- Elbows at 45 degrees
- Controlled descent
- Chest close to floor
- Controlled ascent
- Full lockout at top
Section 3: Common Push-Up Mistakes (And How to Fix Them)
Mistake 1: Sagging Hips
What it looks like: Your hips sink toward the floor, creating a “swayback” position. Your belly is closer to the floor than your chest.
Why it’s a problem: This puts excessive stress on your lower back and reduces the effectiveness of the exercise for your chest and core.
The Fix:
- Engage your glutes and core aggressively
- Imagine your body is a rigid plank—your hips shouldn’t move independently
- Try doing push-ups with your feet on a foam roller or towel—if your hips sag, the roller will move
- Practice planks to build core endurance
Mistake 2: Piking at the Hips
What it looks like: Your hips are raised toward the ceiling, creating an inverted “V” shape. Your head is lower than your hips.
Why it’s a problem: This shifts the load from your chest and shoulders to your upper back and reduces chest activation.
The Fix:
- Bring your hips down, maintaining a straight line
- Think about keeping your body in one straight line
- Imagine pulling your belly button toward your spine
- Practice the plank position against a wall to feel the correct alignment
Mistake 3: Flaring Elbows
What it looks like: Your elbows point straight out to the sides, forming a 90-degree angle with your torso.
Why it’s a problem: This places excessive stress on the shoulder joint, increasing the risk of impingement. It also shifts emphasis from the chest to the shoulders.
The Fix:
- Keep your elbows at a 45-degree angle to your body
- Imagine you’re trying to squeeze a book between your upper arms and torso
- Think of “packing” your shoulders—pull your shoulder blades down and back
- Practice slow, controlled reps to reinforce the proper angle
Mistake 4: Partial Range of Motion
What it looks like: You only lower your body a few inches—nowhere near the floor.
Why it’s a problem: You’re only working a fraction of your chest’s range of motion. You’re missing the most challenging portion of the movement (the bottom) and limiting your results.
The Fix:
- Lower your chest to within an inch of the floor
- If you can’t do this with your current variation, move to an easier variation that allows full range of motion
- Place a towel or yoga block under your chest—aim to touch it with each rep
Mistake 5: Shrugging Shoulders
What it looks like: Your shoulders are hunched up toward your ears, neck tense.
Why it’s a problem: This creates tension in the neck and upper traps, limits your strength, and can lead to shoulder issues.
The Fix:
- Pull your shoulder blades down and back before you start
- Think of “packing” your shoulders into your back pockets
- Keep your neck relaxed—look at a spot on the floor, not straight ahead
Mistake 6: Holding Your Breath
What it looks like: You hold your breath throughout the entire rep.
Why it’s a problem: You create excessive intra-abdominal pressure, limiting your ability to produce force and increasing the risk of dizziness.
The Fix:
- Inhale as you lower your body (descent)
- Exhale powerfully as you push up (ascent)
- Breathe in through your nose, out through your mouth
Section 4: Push-Up Progressions—From Beginner to Advanced
There’s a push-up variation for every fitness level. Start with the variation that challenges you but allows you to maintain perfect form for 8–12 reps.
Level 1: Wall Push-Ups
Perfect for: Complete beginners, those with wrist issues, or anyone recovering from injury.
- Stand an arm’s length from a wall
- Place your hands on the wall at shoulder height
- Lean forward, lowering your chest toward the wall
- Push back to the starting position
Progress to: Incline Push-Ups
Level 2: Incline Push-Ups
Perfect for: Beginners who can’t yet do a knee or full push-up.
- Place your hands on a bench, table, stairs, or sturdy surface (higher = easier)
- Walk your feet back until your body forms a straight line
- Lower your chest toward the surface
- Push back up
Progression: As you get stronger, lower the surface height (e.g., from a table to a bench to a step).
Progress to: Knee Push-Ups
Level 3: Knee Push-Ups
Perfect for: Those building toward full push-ups.
- Start on all fours, knees on the floor
- Hands under shoulders, body straight from head to knees
- Lower your chest toward the floor
- Push back up
Key Point: Keep your body straight from your head to your knees—don’t let your hips pike up or sag down.
Progress to: Full Push-Ups
Level 4: Full Push-Ups
You’ve arrived! Now you’re performing the classic push-up.
- Hands under shoulders, feet hip-width apart
- Body straight from head to heels
- Lower your chest to within an inch of the floor
- Push back up
Progress to: Diamond Push-Ups
Level 5: Diamond Push-Ups
Perfect for: Building triceps strength and chest definition.
- Place your hands close together, forming a diamond shape with your thumbs and index fingers
- Position them directly under your chest
- Perform a push-up, keeping your elbows close to your body
- This variation targets the triceps and inner chest
Progress to: Decline Push-Ups
Level 6: Decline Push-Ups
Perfect for: Adding more challenge to the upper chest and shoulders.
- Place your feet on a bench, chair, or step (feet elevated)
- Hands on the floor, body at an incline
- Perform a push-up—the higher your feet, the harder the exercise
Progress to: Archer Push-Ups
Level 7: Archer Push-Ups
Perfect for: Building unilateral upper body strength.
- Start in a push-up position, hands wider than shoulder-width
- As you lower, shift your weight to one side, bending that elbow and keeping the other arm straight
- Push back up from the bent-arm side
- Alternate sides
Progress to: One-Arm Push-Ups
Level 8: One-Arm Push-Ups
The elite level. This requires significant strength and control.
- Spread your feet wider than shoulder-width for stability
- Place one hand under your chest, the other hand behind your back
- Lower yourself with control
- Push back up with one arm
Section 5: Push-Up Variations for Every Goal
For Strength Building
Weighted Push-Ups
- Place a weighted plate, backpack with books, or resistance band across your back
- Perform push-ups with the added weight
- Focus on controlled reps with full range of motion
Plyometric Push-Ups
- Lower to the floor
- Explosively push up so your hands leave the floor
- Clap if you can (clap push-ups)
- Land softly and immediately lower into the next rep
- Advanced—do not attempt without a solid strength base
For Shoulder Health
Scapular Push-Ups
- Start in a high plank position
- Without bending your elbows, retract and protract your shoulder blades
- Think of pulling your shoulder blades together (retraction) and then pushing them apart (protraction)
- This builds scapular control, critical for shoulder health
Pseudo-Planche Push-Ups
- Start in a high plank with your hands positioned closer to your hips
- Lean forward so your shoulders are slightly past your hands
- Perform a push-up—this builds shoulder strength and stability
For Core Integration
Plank-to-Push-Up
- Start in a forearm plank
- Press into one hand, then the other, to come to a high plank
- Perform a push-up
- Lower back to the forearm plank (one arm at a time)
- This builds core stability and shoulder strength
Push-Up with Leg Lift
- Perform a standard push-up
- At the top of the movement, lift one leg off the floor
- Hold for 2 seconds, then lower
- Repeat on the opposite side
- This increases core demand
For Travel or Small Spaces
Door Frame Push-Ups
- Place your hands on the door frame
- Lean in and perform a push-up
- Great for hotel rooms or limited space
Suitcase Push-Ups
- Place your hands on the handles of two heavy suitcases or sturdy objects
- Perform push-ups with an extended range of motion
- Builds deeper chest activation
Section 6: How to Program Push-Ups into Your Routine
For Beginners
Goal: Build to 10 perfect push-ups.
Frequency: 3 times per week (e.g., Monday, Wednesday, Friday)
Workout:
- Perform 3–5 sets of your current push-up variation
- Choose a variation that allows 8–12 reps with good form
- Rest 60–90 seconds between sets
- Once you can do 3 sets of 12, progress to the next variation
Sample Progression:
- Week 1–2: Wall Push-Ups (3 sets of 12–15)
- Week 3–4: Incline Push-Ups (3 sets of 10–12)
- Week 5–6: Knee Push-Ups (3 sets of 10–12)
- Week 7–8: Full Push-Ups (3 sets of 8–10)
For Intermediate
Goal: Build to 25+ perfect push-ups or advanced variations.
Frequency: 2–3 times per week (as part of a larger upper body or full body workout)
Workout:
- Perform 3–4 sets of your primary push-up variation
- Add 1–2 sets of a secondary variation (e.g., decline, diamond)
- Aim for 8–15 reps per set
- Rest 60–90 seconds between sets
Sample Session:
- Set 1: Full Push-Ups (15 reps)
- Set 2: Full Push-Ups (12 reps)
- Set 3: Decline Push-Ups (10 reps)
- Set 4: Diamond Push-Ups (8 reps)
For Advanced
Goal: Master advanced variations and build maximal strength.
Frequency: 2 times per week (as part of a comprehensive program)
Workout:
- Perform 3–5 sets of your primary advanced variation
- Incorporate tempo work (slow eccentrics, explosive concentrics)
- Add weight or use bands for extra resistance
- Include 2–3 accessory variations
Sample Session:
- Set 1–3: Archer Push-Ups (5–8 reps per side)
- Set 4–5: Weighted Push-Ups (8–12 reps)
- Finisher: Max rep full push-ups (AMRAP)
Push-Up Challenge: 30 Days to 100
Structure:
- Perform 5 sets throughout the day (not consecutively)
- Total reps increase daily
| Day | Total Reps | Breakdown |
|---|---|---|
| 1–3 | 30–40 | 3 sets of 10–15 |
| 4–6 | 45–55 | 4 sets of 12–15 |
| 7–10 | 60–70 | 4 sets of 15–20 |
| 11–15 | 75–85 | 5 sets of 15–20 |
| 16–20 | 90–100 | 5 sets of 18–20 |
| 21–30 | 100+ | 5 sets of 20+ |
This is a classic challenge—many have taken the 100 push-up challenge. It builds endurance and mental toughness. Focus on quality—don’t sacrifice form for numbers.
Section 7: Push-Ups as a Warm-Up and Finisher
As a Warm-Up
Push-ups are excellent for activating the upper body before more demanding exercises.
Upper Body Activation Circuit:
- 10–15 Incline Push-Ups (light)
- 10 Scapular Push-Ups
- 10 Arm Circles (forward and backward)
- 10 Cat-Cow Stretches
As a Finisher
End your workout with a set of push-ups to “finish off” the muscles.
Push-Up Finisher Options:
- AMRAP (As Many Reps As Possible) in 60 seconds
- 3 sets of max reps with 30 seconds rest
- Pyramid: 1, 2, 3, 4, 5, 4, 3, 2, 1 (or more)
Section 8: Push-Ups vs. Bench Press
| Factor | Push-Ups | Bench Press |
|---|---|---|
| Equipment | None | Barbell or dumbbells, bench |
| Accessibility | Anywhere | Requires gym or equipment |
| Muscle Activation | Chest, shoulders, triceps, core | Chest, shoulders, triceps (core less engaged) |
| Progressive Overload | Via variations, tempo, reps | Via adding weight |
| Shoulder Health | Can be excellent with proper form | Can be excellent with proper form |
| Skill Level | Accessible to beginners | Requires more skill and setup |
| Maximal Strength | Limited by body weight | Potentially higher (unlimited loading) |
Key Point: You don’t have to choose. Many strength athletes incorporate both—they use bench press for maximal strength development and push-ups for conditioning, shoulder health, and variety.
Section 9: FAQ—Your Top Push-Up Questions
Q: How many push-ups should I be able to do?
A: For men over 40, performing 20–30 push-ups (for a 40–49 year old) is considered good; 35+ is excellent. For women, 15–25 is good; 25+ is excellent. These are general guidelines—your goal depends on your starting point.
Q: Why can’t I do a full push-up?
A: This is common. It’s usually due to a combination of factors:
- Inadequate upper body strength
- Weak core or glutes (can’t maintain body position)
- Poor shoulder mobility or stability
- Insufficient practice (push-ups require specific coordination)
Start with wall push-ups or incline push-ups and build strength and confidence. Most people can progress to full push-ups within 8–12 weeks of consistent training.
Q: Should I do push-ups every day?
A: You can, but it’s not necessary and may lead to overuse injuries. 2–4 sessions per week is ideal for most people. Your muscles need time to recover and adapt. If you do daily push-ups, vary the volume and intensity.
Q: Do push-ups build a big chest?
A: Yes, push-ups can build a well-developed chest—especially when combined with progressive overload (harder variations, more reps) and proper nutrition. However, for maximum chest size (hypertrophy), bench press with heavy weights is generally more effective. For most people, push-ups provide an excellent balance of strength, size, and function.
Q: How do I make push-ups harder?
A: Several options:
- Add weight (weighted vest, backpack)
- Slow down the tempo (e.g., 3 seconds down, 3 seconds up)
- Elevate your feet (decline push-ups)
- Narrow your hand position (diamond push-ups)
- Add instability (hands on medicine balls)
- Progress to archer or one-arm variations
Q: My wrists hurt during push-ups. What should I do?
A: This is common, especially for beginners. Try:
- Push-up handles (bars that allow a neutral grip)
- Dumbbells or kettlebells (grip the handles so wrists are straight)
- Fist push-ups (on your knuckles—use a mat)
- Wall push-ups (reduces wrist angle)
- Wrist warm-ups (wrist circles, stretching before push-ups)
Q: Can I do push-ups with a shoulder injury?
A: Consult your healthcare provider or physical therapist. In many cases, modified push-ups (incline, wall, or using handles) are safe and can even help rehabilitation. However, always get professional advice tailored to your specific injury.
The VigorForty Take
The push-up is more than just an exercise—it’s a benchmark. It’s a test of your upper body strength, core stability, and body control. And it’s a movement you can train for a lifetime.
A perfect push-up is a beautiful thing. Full range of motion. Controlled tempo. Rigid body position. Clean execution.
But here’s the truth: you don’t need to be perfect to start. You just need to start.
Begin where you are. Wall push-ups. Incline push-ups. Knee push-ups. Whatever variation allows you to maintain good form. Then progress. Add reps. Add intensity. Add challenge. Over weeks and months, you’ll see your strength and confidence grow.
The push-up is the gateway to upper body strength. Master it, and you’ll develop:
- A stronger chest and shoulders
- More defined arms
- A stable, resilient core
- Confidence in your body’s capabilities
- The foundation for more advanced training
One push-up today. Two tomorrow. A lifetime of strength ahead of you.
This article was reviewed by the Vigor Forty Editorial Review Board on July 19, 2026.
🔗 Related Articles
- The Ultimate Beginner’s Guide to Strength Training
- Weightlifting 101: A Simple Guide for Beginners
- Calisthenics for Beginners: Your First Bodyweight Workout Plan
- 5 Foundational Movement Patterns for a Stronger Body
Affiliate Disclosure: Some links in this article may be affiliate links. If you make a purchase through these links, Vigor Forty may earn a small commission at no extra cost to you. We only recommend products we trust.
Related Articles
- The Ultimate Beginner’s Guide to Strength Training (Weightlifting, Calisthenics, and Core)
- Weightlifting 101: A Simple Guide for Beginners
- Calisthenics for Beginners: Your First Bodyweight Workout Plan
- What is Core Stability and Why Does It Matter for Every Lift?
- 5 Foundational Movement Patterns for a Stronger Body
- Perfect Your Push-Up: A Step-by-Step Guide to Building Upper Body Strength
- How to Perform a Perfect Squat: Form Tips for Weightlifting and Bodyweight
- The Plank: More Than Just an Ab Exercise
- How to Combine Calisthenics and Weight Training for Maximum Results
- Sample Weekly Workout Plan: Combining Weights, Bodyweight, and Core
- The Importance of Progressive Overload in Strength Training
- How to Progress Calisthenics Exercises When Bodyweight Gets Easy
- Home Gym vs. Gym Membership: Which is Right for You?
- The Minimalist’s Guide to Strength Training: No Equipment Needed
- Top 5 Pieces of Equipment for a Home Strength Training Setup
- How to Choose the Right Weight for Your Workouts