
Author: Vigor Forty Editorial Team
Medically Reviewed By: Editorial Review Board
Disclaimer: This article is for informational purposes only and is not a substitute for professional medical advice. Read our full Medical Disclaimer.
📌 Key Takeaways
- Your body adapts quickly: What was challenging last month becomes easy this month. To keep making progress, you need to increase the difficulty—even when you can’t add weight.
- There are multiple ways to make bodyweight exercises harder: Change leverage, alter tempo, add reps, reduce rest, increase range of motion, add instability, or progress to advanced variations.
- Progression is about more than just reps: You can make an exercise harder by slowing it down, pausing at the bottom, or changing your body position—all without adding a single pound.
- Each exercise has a progression ladder: From beginner to advanced, there’s a clear path for push-ups, pull-ups, squats, and core exercises. Master each level before moving to the next.
- Adding external weight is the final step: Once you’ve mastered the most challenging bodyweight variations, you can add weight with a vest, backpack, or resistance bands.
Introduction: The Challenge of Bodyweight Training
You’ve been consistent. You’ve done your push-ups, squats, and planks. And now… they feel easy.
This is a good problem to have. It means you’re getting stronger. But it also means you’ve hit a crossroads. If you keep doing the same exercises with the same reps, you’ll stop making progress. Your body has adapted, and now you’re maintaining—not building.
In weightlifting, the solution is simple: add weight. But in calisthenics, it’s not that straightforward. You can’t just slap another 5 pounds on the bar. You need to be more creative.
The good news? There are dozens of ways to make bodyweight exercises harder. You can change leverage, alter tempo, increase range of motion, add instability, and progress to advanced variations—all without any equipment.
This guide will show you exactly how to progress your calisthenics training when bodyweight gets easy. You’ll learn progression ladders for push-ups, pull-ups, squats, and core exercises, along with sample programs to keep you moving forward.
Section 1: The Eight Ways to Make Bodyweight Exercises Harder
Before we dive into specific progressions, let’s look at the universal methods for increasing difficulty.
1. Change Leverage
The most common way to make a bodyweight exercise harder is to change your leverage—moving your body position so gravity has more mechanical advantage against you.
Examples:
- Push-ups: Moving hands closer together (diamond push-ups) or feet elevated (decline push-ups)
- Squats: Narrower stance or single-leg variations
- Rows: Lowering the bar height so your body is more horizontal
2. Alter Tempo
Slowing down the movement increases time under tension, making the exercise significantly harder—even with the same number of reps.
Examples:
- 3-second descent, 3-second ascent
- Pause at the bottom of a squat for 2 seconds
- Pause at the bottom of a push-up for 2 seconds
3. Add Reps
The simplest method: just do more.
Examples:
- 3 sets of 10 → 3 sets of 12 → 3 sets of 15
- When you can do 3 sets of 15 with perfect form, progress to a harder variation
4. Reduce Rest Time
Decreasing rest between sets increases metabolic stress and muscular endurance.
Examples:
- 90 seconds rest → 60 seconds → 45 seconds
- This is particularly effective for building endurance
5. Increase Range of Motion
Go deeper into the movement to recruit more muscle fibers.
Examples:
- Squats: Partial → Parallel → Full (ass-to-grass)
- Push-ups: Chest to floor vs. chest a few inches above the floor
6. Add Instability
Introducing instability forces your stabilizer muscles to work harder.
Examples:
- Push-ups with hands on a stability ball
- Single-leg variations of any exercise
- Planks on an unstable surface
7. Add Isometric Holds
Pausing at the hardest part of the movement increases time under tension.
Examples:
- Pause at the bottom of a squat for 3 seconds
- Pause at the bottom of a push-up for 3 seconds
- Hold a chin-up at the top for 3 seconds
8. Add External Weight
The final step: add weight when bodyweight variations are no longer challenging.
Examples:
- Weighted vest
- Backpack with books or sand
- Resistance bands
- Holding a dumbbell or kettlebell
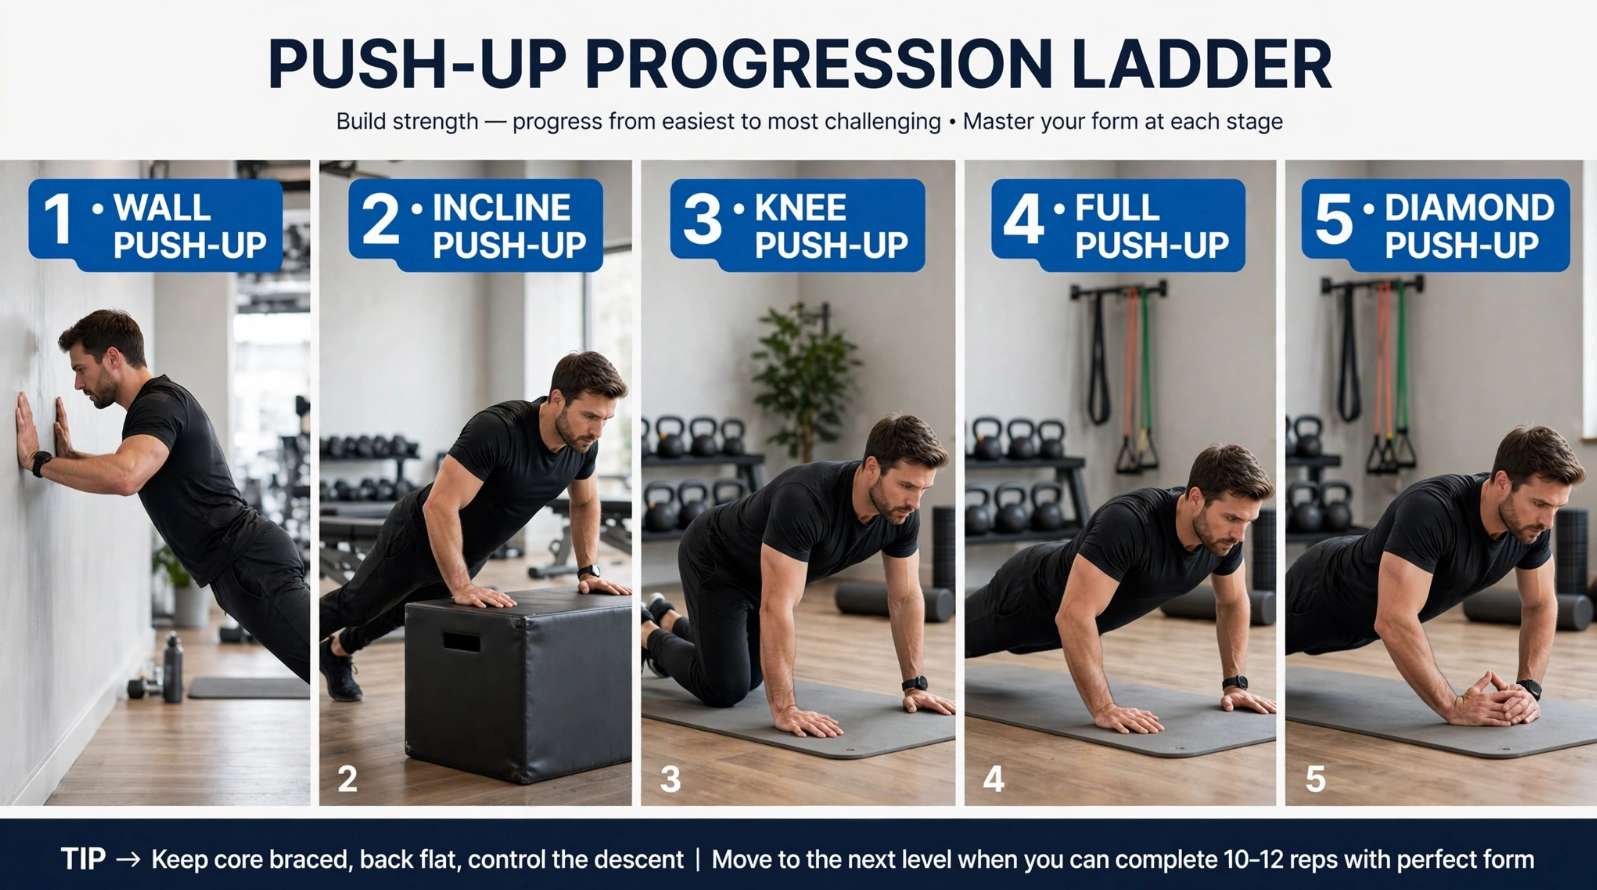
Section 2: The Push-Up Progression Ladder
Push-ups are the foundation of upper body calisthenics. Here’s a complete progression from beginner to advanced.
Level 1: Wall Push-Ups
- Stand an arm’s length from a wall
- Place hands on the wall at shoulder height
- Lean in, lower chest toward wall, push back
- Sets & Reps: 3 x 15–20
Level 2: Incline Push-Ups
- Hands on a bench, table, or stairs (higher = easier)
- Lower chest to the surface, push back up
- Sets & Reps: 3 x 12–15
Level 3: Knee Push-Ups
- Knees on the floor, hands under shoulders
- Lower chest toward floor, push back up
- Sets & Reps: 3 x 10–15
Level 4: Full Push-Ups
- Hands under shoulders, feet hip-width apart
- Lower chest to within an inch of the floor
- Push back up
- Sets & Reps: 3 x 8–15
Level 5: Diamond Push-Ups
- Hands together, forming a diamond shape under chest
- Perform a push-up
- Sets & Reps: 3 x 8–12
Level 6: Decline Push-Ups
- Feet elevated on a bench or step
- Perform a push-up
- Sets & Reps: 3 x 8–12
Level 7: Archer Push-Ups
- Hands wider than shoulder-width
- Shift weight to one side, bend that elbow
- Keep the other arm straight
- Alternate sides
- Sets & Reps: 3 x 5–8 per side
Level 8: Pseudo-Planche Push-Ups
- Hands positioned closer to hips (not under shoulders)
- Lean forward so shoulders are ahead of hands
- Perform a push-up
- Sets & Reps: 3 x 5–8
Level 9: One-Arm Push-Ups
- Feet spread wider for stability
- One hand under chest, other behind back
- Lower with control, push back up
- Sets & Reps: 3 x 3–5 per side
Progression Strategy for Push-Ups
- Master each level: Complete 3 sets of 12–15 reps with perfect form before moving to the next level
- Increase reps first: If you can do 3 sets of 8, work up to 3 sets of 15
- Then progress: Move to the next variation
- Add tempo: Once you’re at full push-ups, add a 3-second descent and 2-second pause at the bottom
Section 3: The Pull-Up Progression Ladder
Pull-ups are the gold standard for upper body pulling strength. Here’s how to build toward them—and beyond.
Level 1: Scapular Pull-Ups
- Hang from a bar with arms extended
- Pull your shoulder blades down and together
- Your body rises slightly (2–3 inches)
- Lower with control
- Sets & Reps: 3 x 10–15
Level 2: Bodyweight Rows (Inverted Rows)
- Set a bar at waist height (or use a sturdy table)
- Lie under the bar, grip it, and pull your chest toward it
- Lower with control
- Sets & Reps: 3 x 10–15
Level 3: Negative Pull-Ups
- Jump or step up to the top of a pull-up position (chin above bar)
- Lower yourself as slowly as possible (5–8 seconds)
- Sets & Reps: 3 x 3–5
Level 4: Assisted Pull-Ups (Band)
- Loop a resistance band over the bar
- Place a foot or knee in the band for assistance
- Perform pull-ups with the band’s help
- Sets & Reps: 3 x 5–10
Level 5: Full Pull-Ups
- Grip the bar slightly wider than shoulder-width
- Hang with arms fully extended
- Pull up until your chin clears the bar
- Lower with control
- Sets & Reps: 3 x 5–10
Level 6: Wide Grip Pull-Ups
- Hands wider than shoulder-width
- Perform a pull-up
- Sets & Reps: 3 x 5–8
Level 7: L-Sit Pull-Ups
- Perform a pull-up with legs extended in front (L-sit position)
- The extended legs increase core demand
- Sets & Reps: 3 x 5–8
Level 8: Archer Pull-Ups
- Grip the bar wide
- Pull to one side, keeping the other arm straight
- Alternate sides
- Sets & Reps: 3 x 3–5 per side
Level 9: Weighted Pull-Ups
- Add weight using a weighted vest, belt, or backpack
- Perform pull-ups
- Sets & Reps: 3 x 5–8
Level 10: One-Arm Pull-Ups
- Grip the bar with one hand
- Pull up using one arm
- Sets & Reps: 3 x 1–3 per side
Progression Strategy for Pull-Ups
- Build the foundation: Start with scapular pull-ups and bodyweight rows
- Practice negatives: Negative pull-ups are highly effective for building pulling strength
- Use bands: Assisted pull-ups with bands help you get the movement pattern
- Volume matters: Aim for total pull-up volume (e.g., 30 reps total, broken into sets)
- Be patient: Pull-ups take time. Many people take 3–6 months to get their first pull-up
Section 4: The Squat Progression Ladder
Squats are the foundation of lower body strength. Here’s how to progress them.
Level 1: Bodyweight Squats (Parallel)
- Feet shoulder-width apart, toes slightly out
- Squat to parallel (thighs parallel to floor)
- Drive through heels to stand
- Sets & Reps: 3 x 15–20
Level 2: Deep Bodyweight Squats (Ass-to-Grass)
- Same form, but go as deep as possible
- Hold the bottom position for 1–2 seconds
- Sets & Reps: 3 x 12–15
Level 3: Bulgarian Split Squats
- Place one foot behind you on a bench or chair
- Lower into a lunge with your front leg
- Push through front heel to return
- Sets & Reps: 3 x 10–12 per leg
Level 4: Pistol Squat Progression (Box Pistols)
- Stand on one leg, other leg extended forward
- Squat down to a box or bench
- Stand back up
- Gradually lower the box height over time
- Sets & Reps: 3 x 5–8 per leg
Level 5: Full Pistol Squats
- One leg extended forward, squat down as deep as possible
- Stand back up using one leg
- Sets & Reps: 3 x 3–5 per leg
Level 6: Shrimp Squats
- Stand on one leg, hold the opposite foot behind you
- Squat down (or to a box)
- Stand back up
- Sets & Reps: 3 x 5–8 per leg
Level 7: Weighted Pistol Squats
- Hold a dumbbell or kettlebell
- Perform pistol squats with added weight
- Sets & Reps: 3 x 3–5 per leg
Progression Strategy for Squats
- Focus on depth first: Full range of motion is more important than speed or reps
- Build unilateral strength: Bulgarian split squats and pistols address imbalances
- Add volume: Increase reps before progressing to harder variations
- Use a box for confidence: Box squats help you build confidence with depth
Section 5: The Core Progression Ladder
Core stability is the foundation of all movement. Here’s how to progress your core exercises.
Level 1: Knee Planks
- Forearms on floor, knees on floor
- Body straight from head to knees
- Hold
- Sets & Duration: 3 x 30–45 seconds
Level 2: Full Forearm Planks
- Forearms on floor, legs extended
- Body straight from head to heels
- Hold
- Sets & Duration: 3 x 45–60 seconds
Level 3: High Planks
- Hands on floor (not forearms)
- Body straight from head to heels
- Hold
- Sets & Duration: 3 x 45–60 seconds
Level 4: Side Planks
- One forearm on floor, body turned to side
- Stack feet and hips
- Hold, repeat on other side
- Sets & Duration: 3 x 30–45 seconds per side
Level 5: Plank with Leg Lifts
- Start in full plank
- Lift one leg off the floor (hold for 2 seconds)
- Lower and repeat on other side
- Sets & Reps: 3 x 10–12 per side
Level 6: Plank with Shoulder Taps
- Start in high plank
- Lift one hand and tap opposite shoulder
- Repeat on other side
- Maintain stable plank throughout
- Sets & Reps: 3 x 10–12 taps per side
Level 7: Hollow Body Holds
- Lie on back, arms extended overhead
- Lift shoulders and legs off the floor
- Only lower back contacts the floor
- Hold
- Sets & Duration: 3 x 30–45 seconds
Level 8: Hollow Body Rocks
- Start in hollow body position
- Rock forward and back (small range of motion)
- Maintain hollow body position throughout
- Sets & Reps: 3 x 10–15 rocks
Level 9: Weighted Planks
- Start in full plank
- Place a weight plate, sandbag, or weighted vest on your back
- Hold
- Sets & Duration: 3 x 30–45 seconds
Progression Strategy for Core
- Quality over quantity: A 30-second perfect plank beats a 2-minute sloppy plank
- Progress in difficulty: Move to harder variations before increasing time
- Include multiple angles: Planks (front), side planks (lateral), hollow body holds (flexion)
- Add movement: Once you can hold a position for 60 seconds, add movement (leg lifts, shoulder taps)
Section 6: Sample Progression Programs
Program A: 12-Week Push-Up Progression
Goal: Build from knee push-ups to diamond push-ups
| Week | Monday | Wednesday | Friday |
|---|---|---|---|
| 1 | Knee Push-ups: 3×10 | Knee Push-ups: 3×12 | Knee Push-ups: 3×15 |
| 2 | Full Push-ups: 3×5 | Full Push-ups: 3×7 | Full Push-ups: 3×8 |
| 3 | Full Push-ups: 3×8 | Full Push-ups: 3×10 | Full Push-ups: 3×12 |
| 4 | Full Push-ups: 3×12 | Full Push-ups: 3×15 | Full Push-ups: 3×15 |
| 5 | Diamond Push-ups: 3×5 | Diamond Push-ups: 3×7 | Diamond Push-ups: 3×8 |
| 6 | Diamond Push-ups: 3×8 | Diamond Push-ups: 3×10 | Diamond Push-ups: 3×12 |
| 7 | Diamond Push-ups: 3×12 | Decline Push-ups: 3×8 | Decline Push-ups: 3×10 |
| 8 | Decline Push-ups: 3×10 | Decline Push-ups: 3×12 | Decline Push-ups: 3×15 |
| 9 | Archer Push-ups: 3×3 per side | Archer Push-ups: 3×5 per side | Archer Push-ups: 3×5 per side |
| 10 | Archer Push-ups: 3×6 per side | Archer Push-ups: 3×8 per side | Archer Push-ups: 3×8 per side |
| 11 | Pseudo-Planche: 3×5 | Pseudo-Planche: 3×6 | Pseudo-Planche: 3×8 |
| 12 | Pseudo-Planche: 3×8 | One-Arm: 3×1 per side | One-Arm: 3×2 per side |
Program B: 16-Week Pull-Up Progression
Goal: Build from 0 to 10 pull-ups
| Phase | Weeks | Exercises | Sets x Reps |
|---|---|---|---|
| 1 | 1–4 | Scapular Pull-ups + Bodyweight Rows | 3×12–15 |
| 2 | 5–8 | Negative Pull-ups + Assisted Pull-ups (bands) | 3×5–8 |
| 3 | 9–12 | Pull-ups (as many as possible) + Band Assisted | 3×3–5 |
| 4 | 13–16 | Pull-ups (increase reps) | 3×5–10 |
Daily Workout (Phase 1):
- Scapular Pull-ups: 3×12
- Bodyweight Rows: 3×12
- Core: 3x Plank (45 seconds)
Daily Workout (Phase 2):
- Negative Pull-ups: 3×5 (slow descent, 5–8 seconds)
- Band-Assisted Pull-ups: 3×8
- Bodyweight Rows: 3×10
Daily Workout (Phase 3):
- Max Pull-ups: 3 sets (as many as you can do)
- Band-Assisted Pull-ups: 3×10
- Negative Pull-ups: 3×3
Daily Workout (Phase 4):
- Pull-ups: 3×5–10 (aim for a specific number)
- Weighted Rows (if available): 3×10
- Core: 3x Hollow Body Hold (30 seconds)
Program C: 8-Week Squat Progression
Goal: Build from bodyweight squats to pistol squats
| Week | Focus | Exercises | Sets x Reps |
|---|---|---|---|
| 1–2 | Depth and Volume | Deep Bodyweight Squats | 3×15–20 |
| 3–4 | Unilateral Strength | Bulgarian Split Squats | 3×10–12 per leg |
| 5–6 | Pistol Progression | Box Pistols (lowering box height) | 3×5–8 per leg |
| 7–8 | Full Pistols | Pistol Squats (or continue progression) | 3×3–5 per leg |
Additional Tips:
- Include mobility work daily (ankle, hip, thoracic spine)
- Practice holding the bottom position of a squat for 30–60 seconds
- Use a support (chair, wall) for balance when starting pistols
Section 7: Common Mistakes in Calisthenics Progression
Mistake 1: Progressing Too Quickly
The Problem: Moving to a harder variation before you’ve mastered the current one.
The Fix: Don’t progress until you can do 3 sets of 12–15 reps with perfect form. Mastery at one level builds the strength and control needed for the next.
Mistake 2: Sacrificing Form for Reps
The Problem: Doing 15 sloppy push-ups instead of 10 perfect ones.
The Fix: Quality over quantity. A perfect push-up is more effective and safer. If your form breaks, stop.
Mistake 3: Neglecting the Eccentric (Lowering) Phase
The Problem: Dropping or rushing the descent of an exercise.
The Fix: Control the descent. It should take 2–3 seconds. This is where much of the strength-building stimulus occurs.
Mistake 4: Only Focusing on Upper Body
The Problem: Spending all your time on push-ups and pull-ups and ignoring lower body.
The Fix: Include squats and their progressions. A balanced body is a strong body.
Mistake 5: Not Tracking Progress
The Problem: You don’t know what you did last week, so you can’t tell if you’re improving.
The Fix: Track your workouts—sets, reps, variations, and any notes on form.
Mistake 6: Ignoring Core Work
The Problem: Doing only push-ups and pull-ups, neglecting core stability.
The Fix: Include core work in every workout. A strong core supports all other movements.
Section 8: FAQ—Your Top Calisthenics Progression Questions
Q: How long does it take to progress to the next variation?
A: It depends on the exercise and your current strength level. For beginners, progress often happens weekly. For intermediates, it may take 2–4 weeks. For advanced, it can take months. Be patient—consistency is key.
Q: What if I’m stuck at a certain level?
A: Try these strategies:
- Increase volume (more sets and reps at the current level)
- Change tempo (slow down the descent)
- Add isometric holds (pause at the hardest part)
- Reduce rest time
- Work on accessory exercises (e.g., if stuck on pull-ups, do more rows)
Q: Can I combine multiple progression methods at once?
A: Yes, but be careful. For example, you can progress to a harder variation and also slow down the tempo. However, don’t change too many variables at once—you won’t know what’s working.
Q: Do I need equipment to progress calisthenics?
A: No. All the progressions in this guide can be done with no equipment except for pull-up variations (which need a bar). For pull-ups, a doorway pull-up bar is an inexpensive investment. For added weight, a backpack with books works well.
Q: How do I know when to add weight to calisthenics?
A: When you can do 3 sets of 15 reps with perfect form at the most challenging bodyweight variation, it’s time to add weight. Start with a small weight (5–10 lbs) and progress from there.
Q: Is progressive overload different for calisthenics than weightlifting?
A: Yes and no. The principle is the same—increase the challenge over time. But in calisthenics, you have more tools (leverage, tempo, variations) and fewer tools (you can’t just add 5 pounds to a push-up). The progression is more creative but equally effective.
The VigorForty Take
Calisthenics progression is a journey, not a destination. Each variation you master builds the strength, control, and confidence needed for the next. From wall push-ups to one-arm push-ups, from scapular pulls to weighted pull-ups, the path is clear—but it requires patience and consistency.
The principles are simple:
- Master the current level: 3 sets of 12–15 reps with perfect form
- Progress to the next variation: Slightly harder, but doable
- Repeat: This is how you build strength that lasts
Remember:
- Progress is not always linear—some weeks you’ll advance, some you won’t
- Quality matters more than quantity
- Recovery is essential—don’t train the same muscle group every day
- Track your workouts—this is how you know you’re progressing
The progression ladder is your map. It shows you where you are, where you’re going, and how to get there. Use it to keep moving forward—even when progress feels slow.
And here’s the secret: The journey itself is the reward. Each step forward builds not just strength, but discipline, body awareness, and confidence. You’re not just getting stronger—you’re becoming someone who can do things they couldn’t do before.
That’s the power of progression. That’s the power of calisthenics.
This article was reviewed by the Vigor Forty Editorial Review Board on July 19, 2026.
🔗 Related Articles
- The Ultimate Beginner’s Guide to Strength Training
- Calisthenics for Beginners: Your First Bodyweight Workout Plan
- How to Combine Calisthenics and Weight Training for Maximum Results
- The Importance of Progressive Overload in Strength Training
Affiliate Disclosure: Some links in this article may be affiliate links. If you make a purchase through these links, Vigor Forty may earn a small commission at no extra cost to you. We only recommend products we trust.
Related Articles
- The Ultimate Beginner’s Guide to Strength Training (Weightlifting, Calisthenics, and Core)
- Weightlifting 101: A Simple Guide for Beginners
- Calisthenics for Beginners: Your First Bodyweight Workout Plan
- What is Core Stability and Why Does It Matter for Every Lift?
- 5 Foundational Movement Patterns for a Stronger Body
- Perfect Your Push-Up: A Step-by-Step Guide to Building Upper Body Strength
- How to Perform a Perfect Squat: Form Tips for Weightlifting and Bodyweight
- The Plank: More Than Just an Ab Exercise
- How to Combine Calisthenics and Weight Training for Maximum Results
- Sample Weekly Workout Plan: Combining Weights, Bodyweight, and Core
- The Importance of Progressive Overload in Strength Training
- How to Progress Calisthenics Exercises When Bodyweight Gets Easy
- Home Gym vs. Gym Membership: Which is Right for You?
- The Minimalist’s Guide to Strength Training: No Equipment Needed
- Top 5 Pieces of Equipment for a Home Strength Training Setup
- How to Choose the Right Weight for Your Workouts