
Author: Vigor Forty Editorial Team
Medically Reviewed By: Editorial Review Board
Disclaimer: This article is for informational purposes only and is not a substitute for professional medical advice. Read our full Medical Disclaimer.
📌 Key Takeaways
- The plank is a full-body exercise: It engages your core, shoulders, back, glutes, and legs—not just your abs. Proper form turns it into a comprehensive stability exercise.
- Quality matters more than duration: A 30-second plank with perfect form is far more effective than a 2-minute plank with sagging hips or a piked position.
- The plank builds functional core stability: Unlike crunches that only work the rectus abdominis, the plank teaches your core to stabilize your spine—a skill that translates directly to lifting, daily activities, and injury prevention.
- There’s a plank variation for every level: From knee planks to weighted planks, the exercise scales to match your current strength and goals.
- Progressive overload applies to planks too: Increase difficulty by adding time, reducing support, adding movement, or increasing instability.
Introduction: The Exercise Everyone Knows (But Few Master)
If there’s one exercise that has become synonymous with core training, it’s the plank.
It’s simple, accessible, and highly effective. No equipment needed. No complex movements to learn. Just you, the floor, and the willingness to hold a position that challenges every muscle in your body.
But here’s the problem: most people are doing planks wrong.
Sagging hips. Piked hips. Rounded shoulders. Holding their breath. These common mistakes don’t just limit results—they can actually stress your lower back and reinforce poor movement patterns.
This guide will transform how you think about the plank. You’ll learn proper form, the muscles it actually works, common mistakes to avoid, progressions for every level, and how to integrate planks into your training for maximum benefit.
Section 1: What the Plank Actually Works
The plank is often called an “ab exercise,” but that’s a significant understatement.
Primary Muscles Worked
| Muscle Group | Role in the Plank |
|---|---|
| Rectus Abdominis | Maintains spinal stability; prevents sagging |
| Transverse Abdominis | Deep core stabilizer; creates intra-abdominal pressure |
| Obliques (Internal and External) | Prevents rotation and lateral flexion |
| Erector Spinae | Maintains neutral spine; prevents rounding |
| Glutes | Maintains pelvic position; prevents hip sag |
| Quadriceps | Keeps legs straight and engaged |
| Deltoids and Pectoralis | Stabilizes the shoulder joint; maintains position |
| Serratus Anterior | Protracts and stabilizes the scapulae |
| Pelvic Floor and Diaphragm | Core stabilizers; support intra-abdominal pressure |
Key Insight: The plank is a full-body tension exercise. To hold it correctly, every major muscle group must be engaged—not just your abs. This is what makes it so effective for building stability and body control.
Section 2: The Perfect Plank—Step by Step
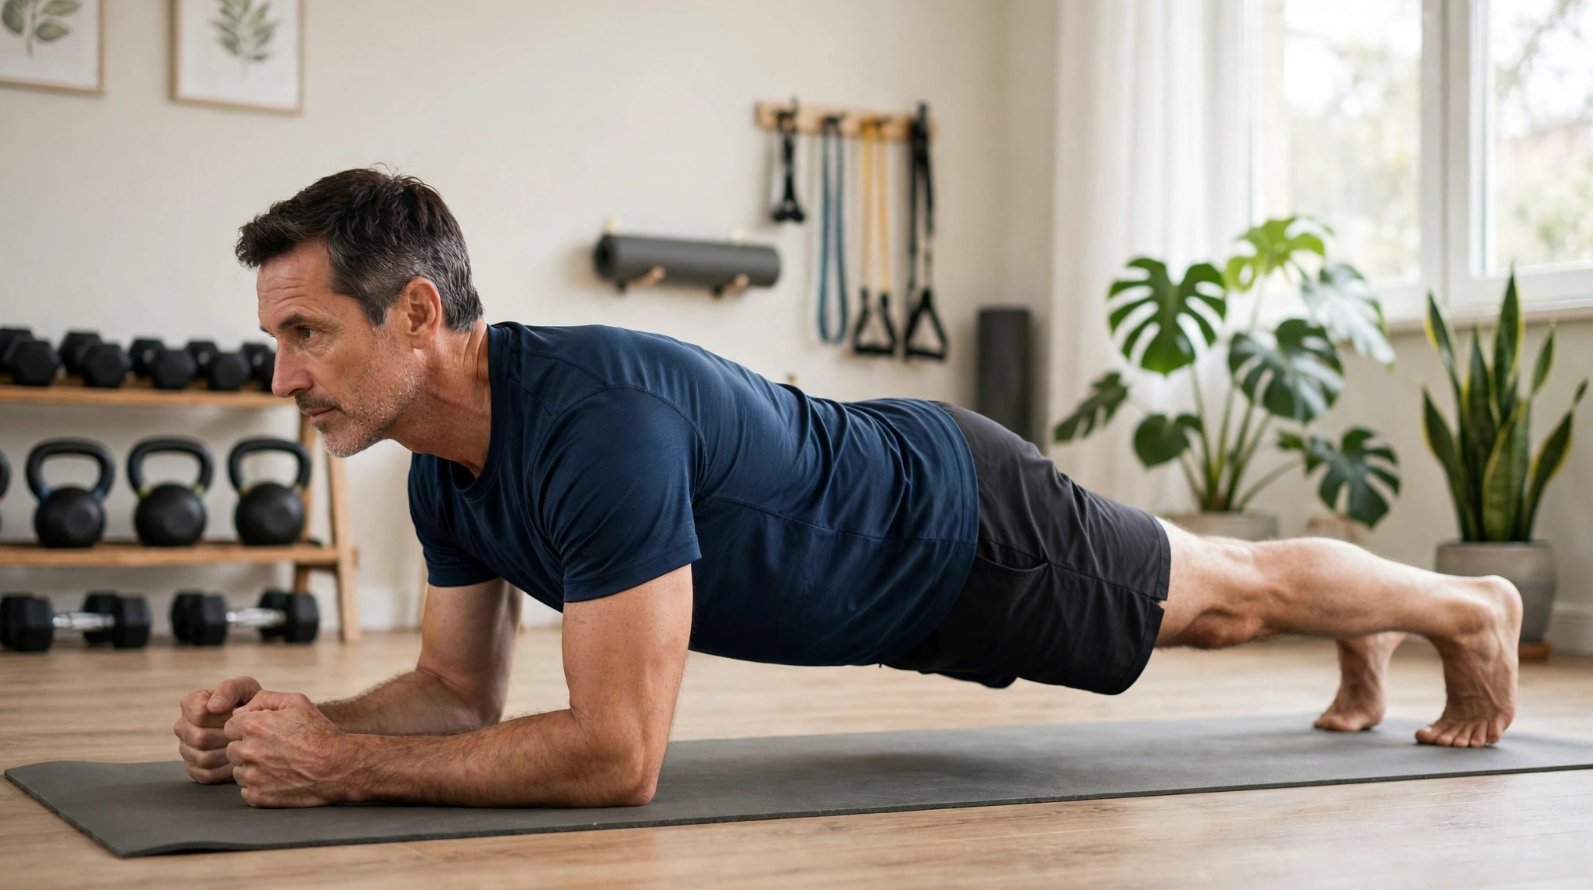
Forearm Plank (The Classic)
- Setup:
- Lie face down on the floor
- Place your forearms on the floor, elbows directly under your shoulders
- Your forearms should be parallel to each other, hands facing forward
- Leg Position:
- Extend your legs straight behind you
- Feet hip-width apart
- Weight on your toes (not the tops of your feet)
- Engage Your Core:
- Draw your belly button toward your spine
- Squeeze your glutes tightly
- This creates a stable, rigid position
- Body Alignment:
- Your body should form a straight line from your head to your heels
- No sagging in the middle
- No piking at the hips
- Imagine you’re a rigid plank of wood
- Shoulder Position:
- Pull your shoulder blades down and back (away from your ears)
- Think about “pushing the floor away” with your elbows
- This protects your shoulders and creates a stable base
- Head and Neck:
- Keep your neck in a neutral position
- Look down at the floor slightly in front of your hands
- Don’t look up or drop your head completely
- Breathing:
- Breathe steadily throughout the hold
- Don’t hold your breath
- Inhale and exhale through your nose or mouth
The Checklist
Before each plank hold, run through this checklist:
- Elbows directly under shoulders
- Forearms parallel
- Feet hip-width apart
- Glutes engaged
- Core braced (belly button to spine)
- Straight line from head to heels
- Shoulders down and back
- Neck neutral
- Breathing steadily
Section 3: Common Plank Mistakes (And How to Fix Them)
Mistake 1: Sagging Hips
What it looks like: Your hips sink toward the floor, creating a “swayback” position. Your belly is closer to the floor than your chest.
Why it’s a problem: This places excessive stress on your lower back and reduces the effectiveness of the exercise for your core. Your lower back is taking the load instead of your abs.
The Fix:
- Squeeze your glutes aggressively—this pulls your pelvis into a neutral position
- Draw your belly button toward your spine
- Imagine you’re trying to hold a coin between your glutes
- Practice in front of a mirror or record yourself to check form
Mistake 2: Piking at the Hips
What it looks like: Your hips are raised toward the ceiling, creating an inverted “V” shape. Your head is lower than your hips.
Why it’s a problem: This shifts the load from your core to your shoulders and upper back. You’re essentially doing a downward dog, not a plank.
The Fix:
- Lower your hips to align with your shoulders and heels
- Think about maintaining a straight line
- Your body should look like a straight board, not a tent
Mistake 3: Rounded Shoulders
What it looks like: Your shoulders are hunched forward, and your upper back is rounded.
Why it’s a problem: This places stress on your shoulder joints and neck. It also reduces the stability of your upper body.
The Fix:
- Pull your shoulder blades down and back
- Think about “pushing the floor away” with your elbows
- Pinch your shoulder blades together slightly
- This creates a stable, active shoulder position
Mistake 4: Holding Your Breath
What it looks like: You hold your breath throughout the entire hold.
Why it’s a problem: This creates excessive intra-abdominal pressure, can cause dizziness, and makes it impossible to sustain the position for longer periods.
The Fix:
- Practice breathing steadily
- Inhale through your nose, exhale through your mouth
- Maintain core engagement while breathing—it’s a skill you need to develop
- Think about breathing into your back ribs (lateral breathing)
Mistake 5: Looking Up or Dropping Your Head
What it looks like: You’re craning your neck to look forward or dropping your head completely.
Why it’s a problem: This strains your neck and cervical spine.
The Fix:
- Keep your neck in a neutral position
- Look at the floor about 6–12 inches in front of your hands
- Your head should align with your spine
Mistake 6: Feet Too Wide or Too Narrow
What it looks like: Your feet are spread very wide or placed very close together.
Why it’s a problem: Feet too wide reduces core engagement (you’re less stable, so your core doesn’t work as hard). Feet too narrow increases instability and makes the hold harder than necessary.
The Fix:
- Start with feet hip-width apart
- As you get stronger, you can bring your feet slightly closer together for more challenge
- Don’t spread them wide unless you’re progressing to a wide-stance plank for a specific reason
Section 4: Plank Progressions—From Beginner to Advanced
There’s a plank variation for every fitness level. Start with the variation that allows you to maintain perfect form for 20–60 seconds.
Level 1: Knee Plank
Perfect for: Complete beginners, those with weak core strength, or anyone recovering from injury.
- Start on all fours, knees on the floor
- Place your forearms on the floor, elbows under shoulders
- Extend your legs back with knees on the floor
- Engage your core, keep your body straight from head to knees
- Hold
Progress to: Full Plank
Level 2: Full Forearm Plank
The classic. You’ve arrived.
- Forearms on the floor, elbows under shoulders
- Legs extended, feet hip-width apart
- Body straight from head to heels
- Hold
Progress to: High Plank (Hands)
Level 3: High Plank
Perfect for: Those who want to build more shoulder stability or transition to push-ups.
- Hands on the floor, directly under shoulders (not forearms)
- Legs extended, feet hip-width apart
- Body straight from head to heels
- Hold
Progress to: Side Plank
Level 4: Side Plank
Perfect for: Building oblique strength and lateral core stability.
- Lie on your side, one forearm on the floor, elbow under shoulder
- Stack your feet (one on top of the other)
- Lift your hips, forming a straight line from head to heels
- Hold, then repeat on the other side
Progress to: Plank with Leg Lift
Level 5: Plank with Leg Lift
Perfect for: Adding more challenge and glute engagement.
- Start in a full plank position
- Lift one leg off the floor (just a few inches)
- Hold, then lower and repeat on the other side
Progress to: Plank with Shoulder Tap
Level 6: Plank with Shoulder Tap
Perfect for: Building shoulder stability and anti-rotation strength.
- Start in a high plank (hands on the floor)
- Lift one hand and tap the opposite shoulder
- Place it back down and repeat on the other side
- Maintain a stable plank position throughout
Progress to: Traveling Plank
Level 7: Traveling Plank
Perfect for: Building full-body coordination and endurance.
- Start in a high plank
- Move your right hand and right foot slightly to the right, then your left hand and left foot
- “Walk” to the side, then reverse direction
- Maintain a stable plank position throughout
Progress to: Weighted Plank
Level 8: Weighted Plank
Perfect for: Advanced trainees who want to increase core strength under load.
- Start in a full plank position
- Have a partner place a weight plate or sandbag on your back
- Hold
- Alternatively, place a backpack filled with books or a weight plate on your lower back
Progress to: Plank with Trx/Unstable Surface
Section 5: Plank Variations for Every Goal
For Core Strength
Weighted Plank
- Place a weight plate, sandbag, or weighted vest on your back
- Hold the plank position for the prescribed time
- The added weight increases the demand on your core
RKC Plank
- Standard plank position, but with maximum tension
- Squeeze your glutes, core, and quads as hard as possible
- This creates full-body tension and builds greater strength in shorter holds
For Shoulder Stability
Plank on Stability Ball
- Place your forearms or hands on a stability ball
- Hold the plank position—the instability challenges your shoulders and core
Plank with Hand Walkouts
- Start in a high plank
- Walk your hands forward slowly, then back
- This increases shoulder and core demand
For Core Endurance
Long Plank Holds
- Build up to holding a plank for 2–3 minutes
- Focus on maintaining perfect form throughout
- If your form breaks, stop and rest
Plank with Alternating Arm/Leg Extensions
- Start in a high plank
- Extend one arm forward and the opposite leg back
- Hold for 2 seconds, then return to start
- Repeat on the other side
For Functional Strength
Plank to Downward Dog
- Start in a high plank
- Push your hips up and back into a downward dog position
- Hold for 2 seconds
- Return to plank
- This builds shoulder stability and hip mobility
Mountain Climbers
- Start in a high plank
- Drive one knee toward your chest, then return to start
- Alternate sides rapidly
- Builds core endurance and coordination
Section 6: How to Program Planks into Your Routine
For Beginners
Goal: Build to 60 seconds of perfect plank.
Frequency: 3 times per week (as part of your workout or on separate days)
Workout:
- Perform 3–5 sets of your current plank variation
- Hold for as long as you can with perfect form
- Rest 60–90 seconds between sets
- If your form breaks, stop the set
Sample Progression:
- Week 1–2: Knee Planks (3 sets of 20–30 seconds)
- Week 3–4: Full Planks (3 sets of 20–30 seconds)
- Week 5–6: Full Planks (4 sets of 30–45 seconds)
- Week 7–8: Full Planks (4 sets of 45–60 seconds)
For Intermediate
Goal: Build core endurance and stability.
Frequency: 2–3 times per week
Workout:
- Perform 3–4 sets of planks
- Include variations (e.g., side planks, plank with leg lifts)
- Hold for 45–90 seconds per set
- Rest 60–90 seconds between sets
Sample Session:
- Full Plank: 3 sets of 45–90 seconds
- Side Plank: 3 sets of 30–60 seconds per side
- Plank with Leg Lifts: 3 sets of 10–15 reps per side
For Advanced
Goal: Build maximal core strength and stability.
Frequency: 2 times per week
Workout:
- Perform 3–5 sets of challenging plank variations
- Incorporate weighted planks, instability, or movement
- Hold for 60–120 seconds or until failure
Sample Session:
- Weighted Plank: 4 sets of 45–60 seconds
- Side Plank with Leg Lift: 3 sets of 30–45 seconds per side
- Plank with Shoulder Taps: 3 sets of 20 taps per side
- RKC Plank: 3 sets of 20–30 seconds (maximum tension)
Plank as Part of Your Workout
As a Warm-Up:
- 2 sets of 30-second planks to activate your core
- Followed by dead bugs and bird dogs for full core activation
Between Sets:
- 30–60 second planks between sets of other exercises
- This keeps your core engaged throughout the workout
As a Finisher:
- 3 sets of max-hold planks at the end of your workout
- This builds endurance and mental toughness
Section 7: Plank Challenges
30-Day Plank Challenge
| Day | Total Time | Breakdown |
|---|---|---|
| 1–3 | 60 seconds | 3 sets of 20 seconds |
| 4–6 | 90 seconds | 3 sets of 30 seconds |
| 7–10 | 120 seconds | 4 sets of 30 seconds |
| 11–14 | 150 seconds | 5 sets of 30 seconds |
| 15–18 | 180 seconds | 3 sets of 60 seconds |
| 19–22 | 210 seconds | 3 sets of 70 seconds |
| 23–26 | 240 seconds | 4 sets of 60 seconds |
| 27–30 | 300 seconds | 5 sets of 60 seconds |
Key Point: Quality over quantity. If your form breaks, stop the set. The goal is to build your hold time with perfect form, not to cheat your way to longer holds.
5-Minute Plank Challenge (Advanced)
Goal: Hold a plank for 5 consecutive minutes.
Strategy:
- Build gradually over 8–12 weeks
- Focus on perfect form—if your form breaks, stop
- Use breathing techniques to manage the burn
- Distract yourself (music, visualization, counting)
Progression Plan:
- Week 1: 3 sets of 60 seconds
- Week 2: 3 sets of 75 seconds
- Week 3: 3 sets of 90 seconds
- Week 4: 4 sets of 75 seconds
- Week 5: 4 sets of 90 seconds
- Week 6: 3 sets of 120 seconds
- Week 7: 4 sets of 105 seconds
- Week 8: 5 sets of 90 seconds
- Week 9: 4 sets of 120 seconds
- Week 10: 5 sets of 105 seconds
- Week 11: 3 sets of 150 seconds
- Week 12: 5 minutes straight
Section 8: Plank vs. Crunches
| Factor | Plank | Crunch |
|---|---|---|
| Muscles Targeted | Full core (abs, obliques, back, glutes) | Primarily rectus abdominis |
| Functional Benefit | Builds stability for daily activities and lifting | Limited functional carryover |
| Back Safety | Low risk with proper form | Can strain neck and lower back |
| Scalability | Highly scalable (time, variations, weight) | Limited scalability |
| Whole Body Engagement | Engages shoulders, glutes, legs | Minimal whole-body engagement |
| Injury Prevention | Excellent for back pain prevention | May contribute to back issues |
Key Point: Both have their place, but for building functional core stability and protecting your lower back, the plank is superior.
Section 9: Planks and Back Pain
If you have lower back pain, planks can be part of your solution—if done correctly.
How Planks Help Back Pain
- Strengthens the muscles that support your spine
- Teaches core bracing (a skill that protects your back during daily activities)
- Improves body awareness and posture
- Reduces reliance on passive structures (ligaments, discs) for stability
How Planks Can Worsen Back Pain
- If you have sagging hips (puts stress on your lower back)
- If you hold your breath (increases intra-abdominal pressure, which can be problematic for some conditions)
- If you hold the position for too long and your form breaks
Tips for Planking with Back Pain
- Start with knee planks: This reduces the load on your back
- Focus on form: Maintain a flat back—no sagging, no piking
- Keep holds short: 10–20 seconds with perfect form is better than 60 seconds with poor form
- Breathe steadily: Don’t hold your breath
- Stop if you feel pain: Muscle burn is normal; joint or back pain is not
- Consult a professional: If you have chronic back pain, work with a physical therapist or qualified trainer
Section 10: FAQ—Your Top Plank Questions
Q: How long should I hold a plank?
A: For beginners, aim for 20–30 seconds with perfect form. For intermediates, 60 seconds. For advanced, 2 minutes or more. Quality matters more than duration—a 30-second plank with perfect form is better than a 2-minute plank with sagging hips.
Q: How many planks should I do per day?
A: 3–5 sets of your max hold is typical. However, you don’t need to do them every day—2–4 times per week is sufficient for most people. Your core needs time to recover and adapt.
Q: Are planks bad for your shoulders?
A: No—when done with proper form, planks strengthen the muscles that stabilize your shoulder joints. However, if you have pre-existing shoulder issues, planks can exacerbate them. Use the plank variation that feels comfortable and doesn’t cause pain. If shoulder pain persists, consult a physical therapist.
Q: Should I do planks before or after my main lifts?
A: This depends on your goals. If you want to activate your core for main lifts, do planks before (as part of your warm-up). If you want to build core endurance without fatiguing your core before heavy lifts, do planks after. For most people, a core activation warm-up (short planks) followed by a core finisher (longer holds) works well.
Q: Can I do planks every day?
A: Yes, but it’s not necessary and may lead to overuse issues. 2–4 times per week is ideal for most people. If you do daily planks, vary the intensity and volume.
Q: How do I make planks harder?
A: Several options:
- Add time
- Progress to harder variations (side planks, weighted planks)
- Add movement (shoulder taps, leg lifts)
- Add instability (planks on a stability ball, Bosu ball, or balance board)
- Add weight (weighted vest, backpack, weight plate)
Q: Do planks build a six-pack?
A: Yes—but with a caveat. Planks build the deep stabilizing muscles that give your core a tight, strong appearance. However, visible abs depend on body fat percentage. You can have the strongest core in the world, but if it’s covered by a layer of fat, your six-pack won’t be visible. Nutrition is key for visible abs.
The VigorForty Take
The plank is one of the most underrated exercises in fitness. It’s simple, accessible, and incredibly effective. And while it’s often called an “ab exercise,” it’s actually a full-body movement that builds strength, stability, and body control.
But here’s the truth: A plank is only as good as its form. A 30-second perfect plank builds more strength and stability than a 2-minute plank with sagging hips and rounded shoulders.
Start where you are. Knee planks, full planks, side planks. Focus on form first, then time. Progress when you can hold the position with perfect form. Be patient. Your core strength will grow.
What you’ll gain:
- A stronger, more stable core
- Better posture
- Reduced back pain risk
- Improved performance in all other lifts
- Greater body awareness and control
The plank is the foundation. Build it strong.
This article was reviewed by the Vigor Forty Editorial Review Board on July 19, 2026.
🔗 Related Articles
- The Ultimate Beginner’s Guide to Strength Training
- What is Core Stability and Why Does It Matter for Every Lift?
- 5 Foundational Movement Patterns for a Stronger Body
- Perfect Your Push-Up: A Step-by-Step Guide to Building Upper Body Strength
Affiliate Disclosure: Some links in this article may be affiliate links. If you make a purchase through these links, Vigor Forty may earn a small commission at no extra cost to you. We only recommend products we trust.
Related Articles
- The Ultimate Beginner’s Guide to Strength Training (Weightlifting, Calisthenics, and Core)
- Weightlifting 101: A Simple Guide for Beginners
- Calisthenics for Beginners: Your First Bodyweight Workout Plan
- What is Core Stability and Why Does It Matter for Every Lift?
- 5 Foundational Movement Patterns for a Stronger Body
- Perfect Your Push-Up: A Step-by-Step Guide to Building Upper Body Strength
- How to Perform a Perfect Squat: Form Tips for Weightlifting and Bodyweight
- The Plank: More Than Just an Ab Exercise
- How to Combine Calisthenics and Weight Training for Maximum Results
- Sample Weekly Workout Plan: Combining Weights, Bodyweight, and Core
- The Importance of Progressive Overload in Strength Training
- How to Progress Calisthenics Exercises When Bodyweight Gets Easy
- Home Gym vs. Gym Membership: Which is Right for You?
- The Minimalist’s Guide to Strength Training: No Equipment Needed
- Top 5 Pieces of Equipment for a Home Strength Training Setup
- How to Choose the Right Weight for Your Workouts